If you follow us on social media (which you should) then you know that we’ve recently moved into a new office building. It’s our very own space that’s big enough to host meetings and get-togethers, like our Open House coming up on January 14th. It’s also big enough to have an 8-foot-tall Christmas tree in the front window!
As a new business in a new office, we knew we wanted to decorate for Christmas, but of course, we’re starting from scratch on the decoration. We could have gone to the store and bought one of those big tubes of generic Christmas ornaments, but that’s not quite our style. Dogwood loves Christmas and we love the people who make up our company, so we wanted to display them and the things that make us who we are right on our tree.
Therefore, being the Christmas ornament aficionado, I took on the job of creating our year in review via Christmas ornaments. We did this in two parts. Part 1 was salt dough ornaments that we (and our children) painted at our Christmas party. Part 2 was photo ornaments of pictures from the year.
Salt Dough Ornaments
There are tons of recipes for salt dough ornaments on the internet. It’s super simple but can also be a bit frustrating if you don’t have the tips and tricks of the trade. To best make salt dough ornaments here’s what you need to do. Make a dough that is 1-part salt, 2-parts all-purpose flour, and 1-part water. After making the dough roll it out on a baking sheet or another oven-safe surface.
Set it in the freezer for about 5 minutes and then cut out your shapes with whatever cookie cutters you have available. Try to be smart with your placement so you can get the most out of that one cookie sheet. Remove the excess dough and place the sheet in a preheated oven at 200 degrees. Let them stay there for at least an hour before decorating. After that, you can use paint and markers to decorate them.
Here are a few of the ones that we made!

Picture Ornaments
We also made picture ornaments that are beautiful but not so time or kid-friendly. These take a lot of work and effort but are so worth it in the end. The first thing you’ll want to do is find what Christmas ball ornaments you want to use. I use these 2.6in plastic ball ornaments from Michael’s because they won’t shatter and come in a pack of 25.
Next, you’ll want to pick out your pictures and size them to the correct dimensions. I do this by inserting them into a word document and changing their size to where the shortest side is 2.5 inches. This can change depending on the size of your ornaments. Then, print your pictures out on white cardstock.
If you’re going to be cutting them out by hand, I’d suggest using a mason jar ring to draw a circle around the area of the picture you’re going to be cutting out. Or, if you have a circle punch like this one that I will definitely be investing in next year, then you can simply turn the punch over and make sure the area you want to cut out is in the opening. Cut out one plain white circle for each photo. You’ll use these as the back of your photo and can write the year or whatever Christmas greeting you want on it (you can also design and print these if you wish).
Once all your circles have been cut, you’ll begin putting the inside of the ornament together. Place your picture face down and place a piece of double-sided tape down the center. Then take a 6 to 8-inch piece of fishing line, fold it in half, and place it in the center of your tape. Put another piece of tape over the line and on the edges of the circle. Finally, place the white circle on top and trim off any excess that might be showing on either side.
You’ll now roll your picture into a tube small enough to fit in the opening of your ornament. Once it’s inside the ornament use a pencil or dowel to flatten it back out again. From here you can add glitter or fake snow or mini pom-poms to decorate the inside like a snow globe.
Take the ends of your fishing wire and thread them through the small holes in the ornament’s top. Place the top back on the ornament and tie the ends of the fishing wire so that the picture stays suspended inside the ornament.
You can then use hot glue to add a pretty bow or if you used small glitter you can use the glue to fill in the holes, so you don’t get glitter bombed every Christmas and tada! You have a Christmas photo ornament.
Click Here for a PDF of all the materials and instructions.
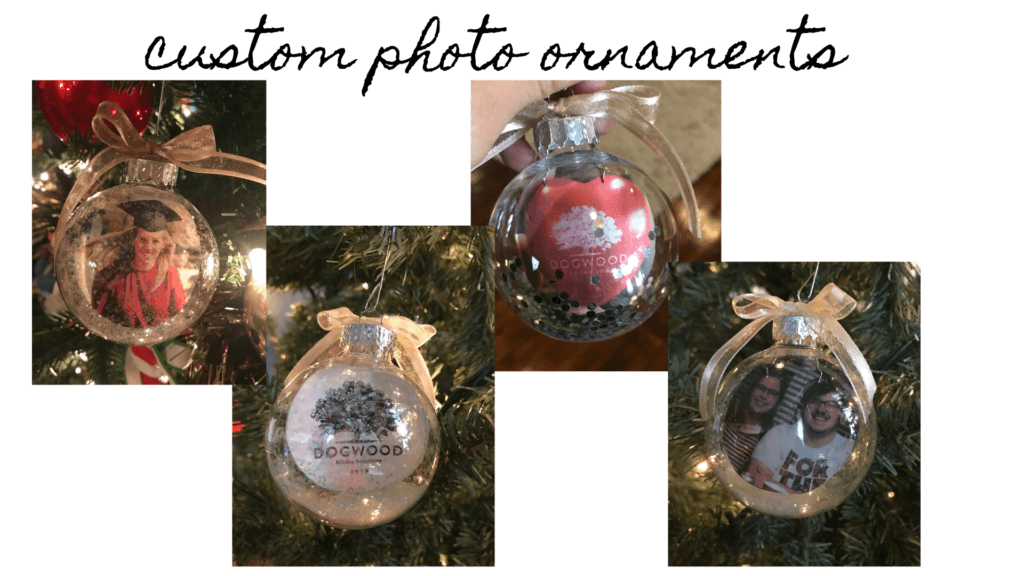
Here are some of the picture ornaments we made! Each employee has one with their family. We also have some of the new building, our made with heart stress balls, our exhibit display and more.

Why Go Through All that Trouble?
So why did we go through all this trouble just for Christmas ornaments? Well partially because I adore Christmas ornaments and never think you can have too many. The more important reason though is that Dogwood is so much more than a digital marketing company. We’re people from lots of different backgrounds with lots of different talents that come together to make something awesome.
We aren’t just a business or coworkers; we’re friends and the things we go through in life make us who we are and therefore make Dogwood what it is. We wanted to document some of the things that have happened this year. In 2019 we’ve had 2 weddings, 2 graduations, added 5 employees, celebrated Thanksgiving, Christmas, and an adoption together, moved into 2 new office spaces and that’s just the beginning. We’ve also done a lot of great work together.
So that’s why we took the time to make something special for our Christmas tree. 2019 was a crazy year for all of us and 2020 shows no signs of slowing down. If you’d like to be a part of all the amazing things going on at Dogwood, contact us! We’d love to work with you.
This post was originally written for Dogwood Media Solutions and was published on December 23, 2019.

